|
Home
| Vinyl Windows |
Aluminum Windows |
FAQ | Dealer
Locator | About Us
| Contact
Us
|
Greenhouse
Window Installation Instructions
|


|
Installation Guidelines
For Existing Construction
- Choose a Tru-Frame® Greenhouse Window
large enough to fit around your old window.
It is perfectly acceptable to have the Tru-Frame®
Greenhouse Window oversized at top and sides
while matching the existing sill height of your
old window.

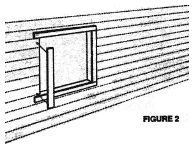
- Check the surface around the old window. If
there is a smooth continuous level and even
plane around it, you can attach the mounting
flanges of the Tru-Frame® Greenhouse Window
directly to this surface. Some home exteriors
are simply too uneven to the mount the Tru-Frame®
Greenhouse Window without first attaching some
furring strips at least 3/4" thick. (see
figure 2)

- Anchor furring strips using a generous bead
of caulking with fasteners long enough to penetrate
deep into the framing. Be certain to recess
the anchoring bolts or screw heads maintaining
a smooth continuous surface.
- Run a generous bead of caulking around the
entire mounting flange where it will meet the
mounting surface. With some assistants, raise
the window into place. Center the Tru-Frame®
Greenhouse Window allowing clearance on both
sides. Bottom pan should level and line up with
your old window sill. Attach window to jambs,
sill, and header with screws long enough to
penetrate deep into framing. Run a neat bead
of caulking around the joint between the flange
and the mounting surface. Trim off as desired.
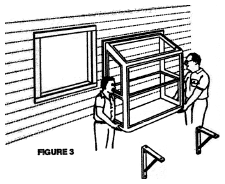
- For window sizes 5' and larger, support bracing
is highly recommended on each end of the window
(Warranty could be void without proper support).
These supports can be constructed as part of
the wall framing or metal support brackets may
be fabricated to adequately support the window.
Support brackets can be purchased separately
from your Tru-Frame® Dealer. Fasteners to
supplied by installer (1/4" X 3" Lag
screws are suggested for wall mounting). Brackets
must attach to the vertical studs below the
window. For 8' windows a third support should
also be used in the center. (see figure 3)

|
|

|
|